Extending Kotlin compiler with KSP

Alireza Fard
14/08/2024
Kotlin compiler can be extended by KSP.
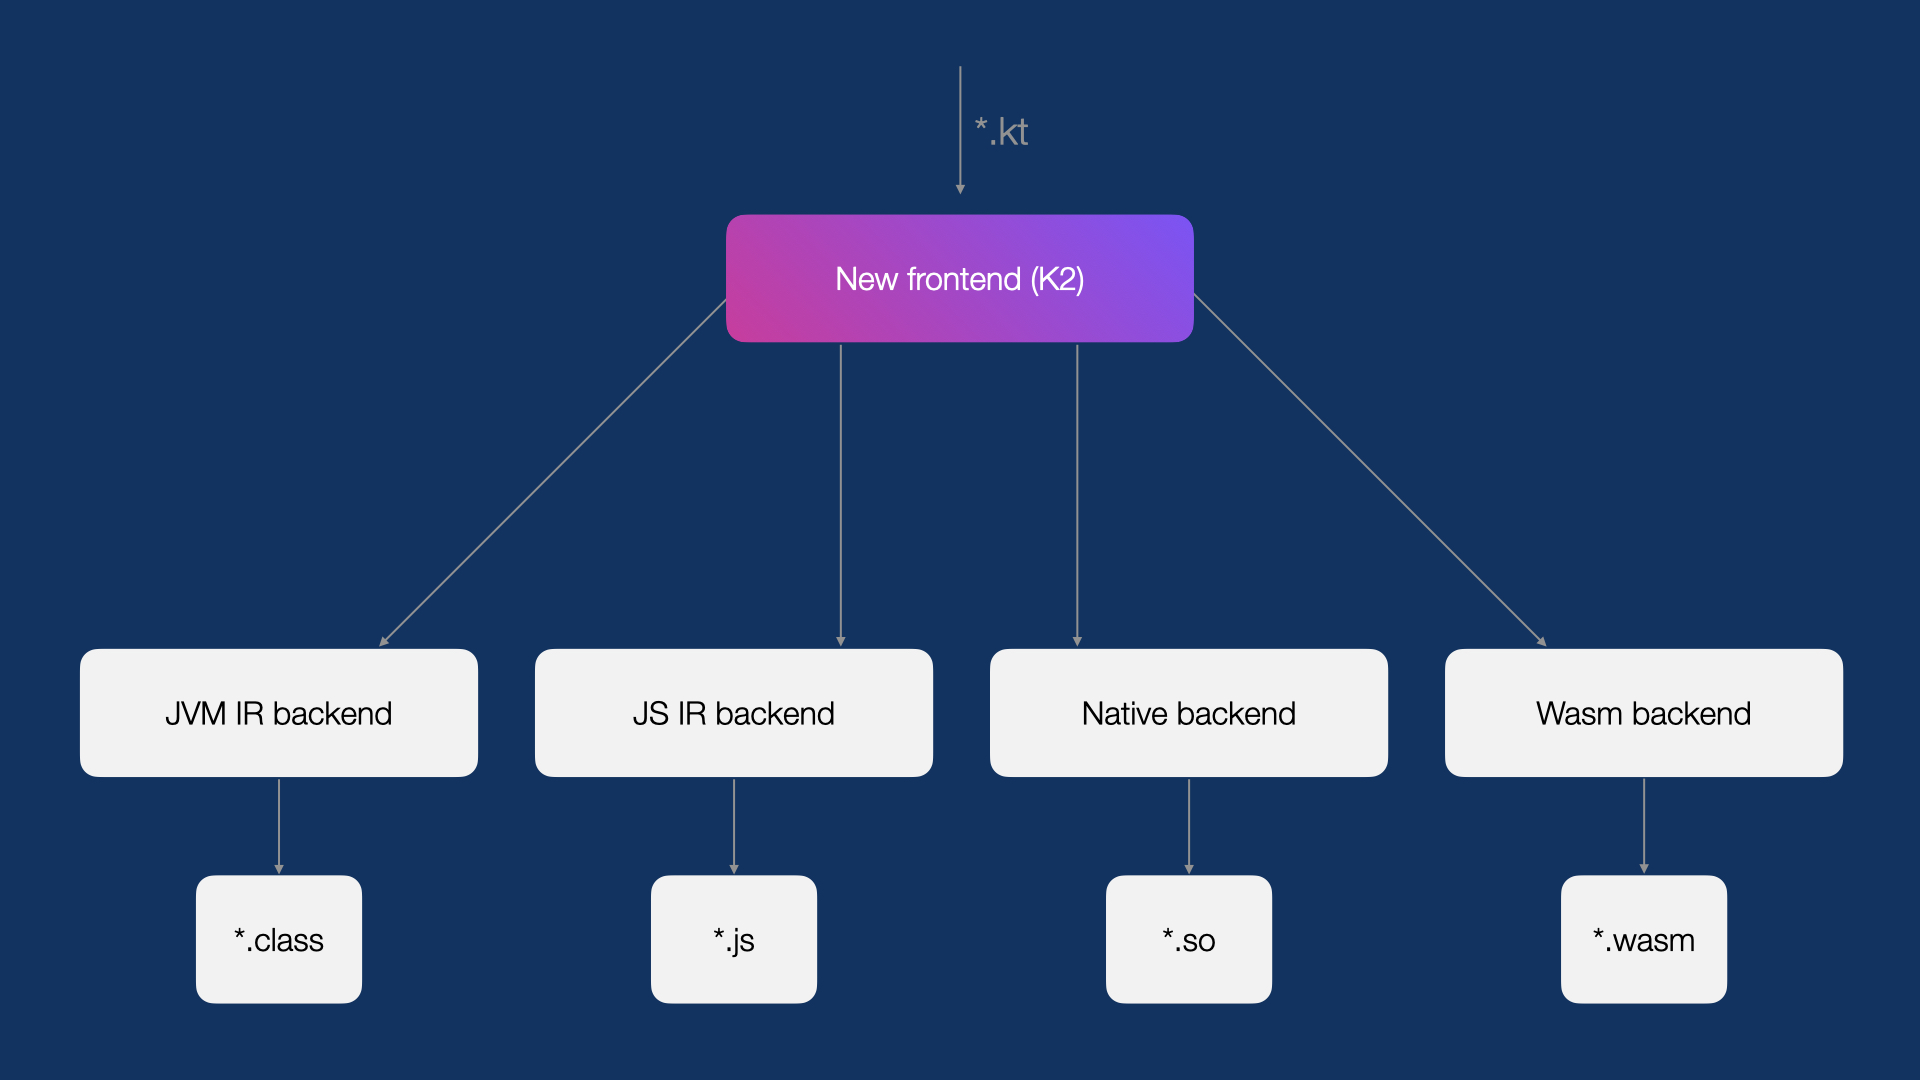
Recently, JetBrains revamped the Kotlin compiler and introduced a brand-new version called the K2 Compiler . Let's take a look at its internal structure and explore how we can extend the compiler using KSP.

The new Kotlin compiler is stable across all target platforms: JVM, Native, Wasm, and JS. It has two main components: the Frontend and the Backend. Most of the updates in K2 focus on the Frontend part of the compiler.
This new compiler brings significant performance improvements, increases the speed of language feature development, unifies all platforms supported by Kotlin, and offers better support for multiplatform projects.
Before we dive in, we need to understand what a compiler is. According to the definition from Wikipedia:
a compiler is a computer program that translates computer code written in one programming language (the source language) into another language (the target language). The name "compiler" is primarily used for programs that translate source code from a high-level programming language to a low-level programming language (e.g. assembly language, object code, or machine code) to create an executable program. Compilers divided into two types

- One-pass:
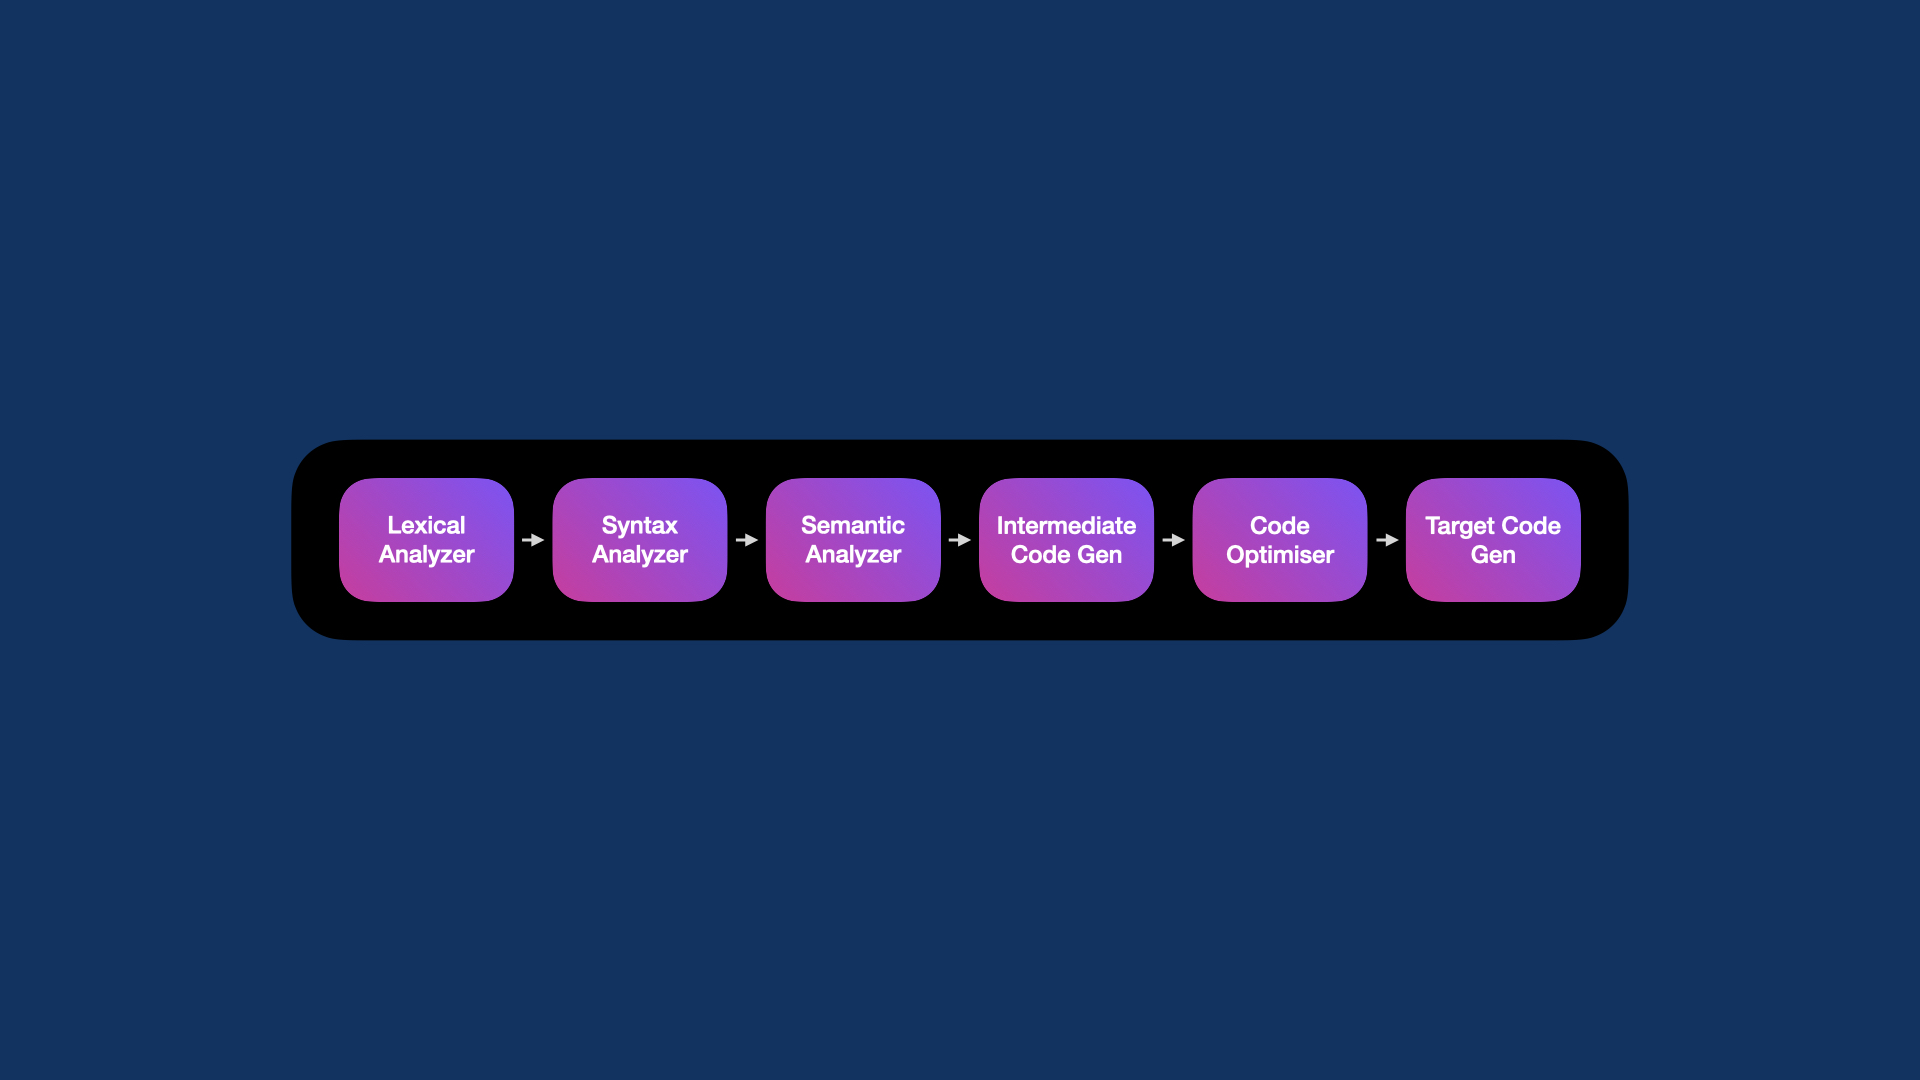
A one-pass compiler is a type of compiler that passes through each part of the compilation unit exactly once. These compilers are faster and smaller than multi-pass compilers. However, a disadvantage of a one-pass compiler is that it is less efficient compared to a multi-pass compiler. A one-pass compiler processes the input in a single pass, moving directly from lexical analysis to code generation, before returning for the next read.
- Multi-pass:
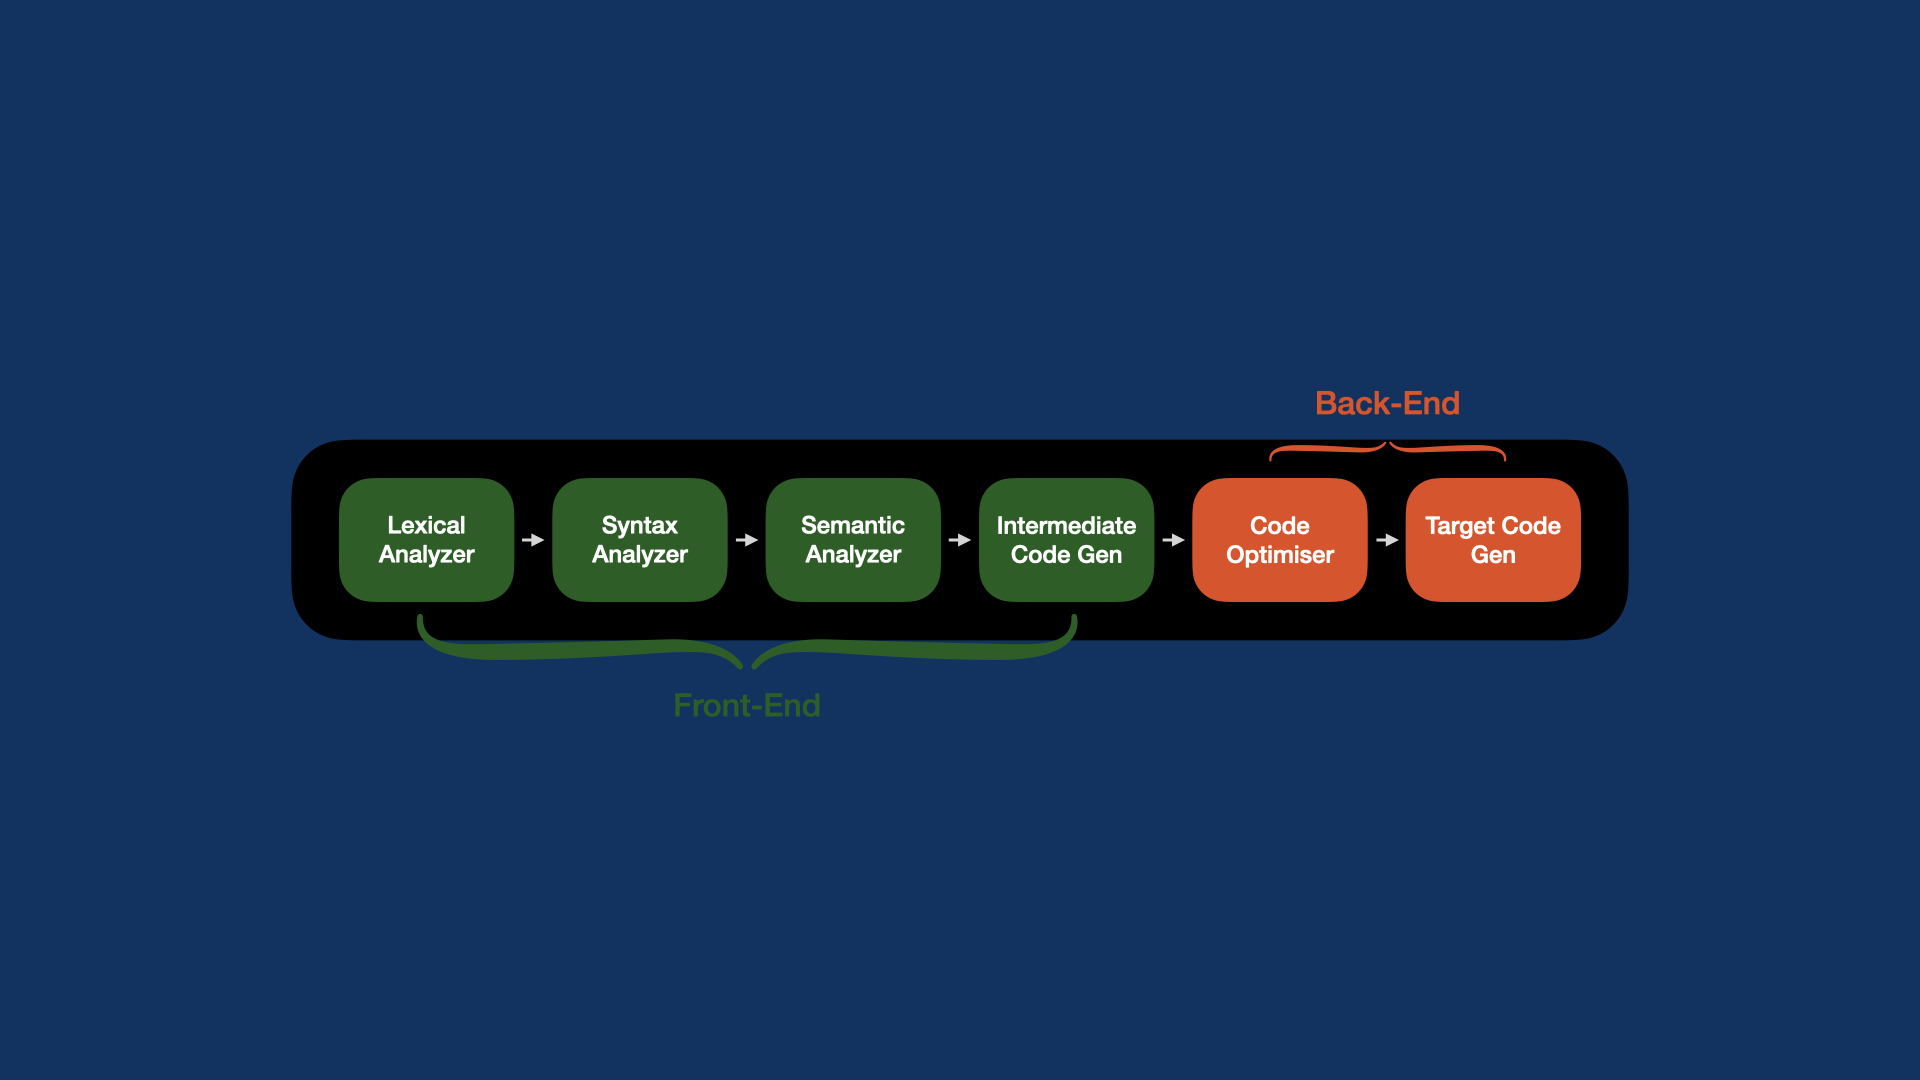
A multi-pass compiler, on the other hand, processes the source code or abstract syntax tree of a program multiple times. In a multi-pass compiler, the compilation phases are typically divided into two passes: the Frontend and the Backend.

A multi-pass compiler design is typically divided into Frontend and Backend phases.
The Frontend analyzes and translates the source code into an intermediate representation (IR). This IR serves as a bridge between the high-level source language and the target machine code.
The Backend then processes this IR to generate executable code for the target computer architecture. During this phase, the Backend often applies various optimization techniques to enhance the efficiency of the resulting code, focusing on improving factors such as execution speed and memory usage.
For extending compiler we need to add a layer between the frontend and the backend, Kotlin has many options for this matter and let's review them
-
Annotation Processing: Early versions of Kotlin were built on the Java ecosystem, making it compatible with the JVM and the Java compiler. In the Java compiler, there is a mid-end step called annotation processing. During this step, the compiler scans the source code for annotations and then invokes any annotation processors configured to process those annotations.
-
Compiler Plugins: In Kotlin, instead of Java annotation processing, we use compiler plugins. Both serve similar purposes, but they operate at different levels and offer different capabilities. Kotlin compiler plugins allow developers to extend the functionality of the Kotlin compiler itself. As a result, they provide deeper integration and more advanced features. While Kotlin compiler plugins are powerful, they come with some downsides. They can be more complex to develop compared to Java annotation processors, as they require a deeper understanding of the Kotlin compiler internals and APIs. Additionally, the APIs are not stable and are private, making the process of learning how to develop a plugin a challenging task.
-
Kapt: To address the complexity of Compiler Plugins, JetBrains developed a compiler plugin named Kapt (which stands for Kotlin Annotation Processing Tool). Kapt allows you to use your existing Java annotation processors within your Kotlin codebase by generating Java stubs from your Kotlin files. While Kapt is useful for easy migration from Java, it comes with some costs. It operates on Java constructs, meaning that Kotlin-specific features, such as data classes and top-level functions, are not fully modeled. Another significant issue is that, to bridge the gap between Kotlin and Java, Kapt generates Java stubs to enable integration, which leads to performance issues and slower build times. Additionally, since Kapt is tied to the Java ecosystem, it does not work with other ecosystems that Kotlin supports, such as Kotlin/JS and Kotlin/Native.
-
KSP: To address this problem, Google developed a new compiler plugin named Kotlin Symbol Processing (KSP). KSP allows developers to integrate additional lightweight plugins into the compilation process. How does KSP work? It simplifies the complexity of compiler plugins by providing a much simpler API, which developers can use to write lightweight compiler plugins, abstracting away much of the underlying complexity.
How to create your own compiler with KSP?
First, you need to create a new module to set up the necessary dependencies.
plugins {
    id("java-library")
    id("org.jetbrains.kotlin.jvm")
}

java {
    sourceCompatibility = JavaVersion.VERSION_17
    targetCompatibility = JavaVersion.VERSION_17
}

dependencies {
    implementation("com.google.devtools.ksp:symbol-processing-api:2.0.0-1.0.23")
}
Make sure the KSP version is synced with the Kotlin version, as each KSP version is released alongside its corresponding Kotlin compiler.
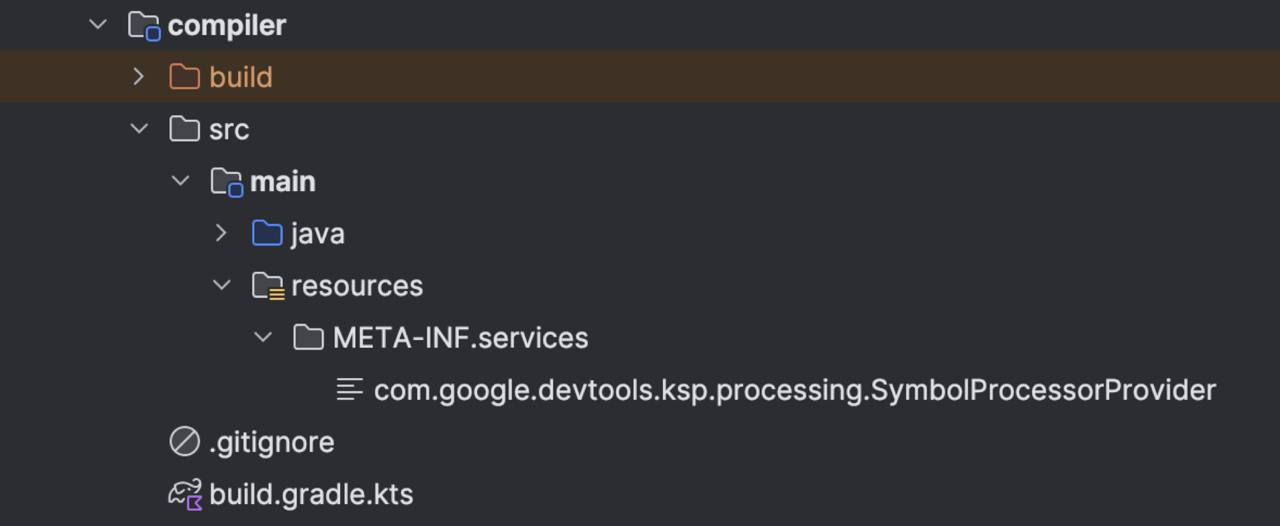
In the resources package, add a META-INF/services directory and create a new file following the convention below:

com.google.devtools.ksp.processing.SymbolProcessorProvider
Inside the SymbolProcessorProvider define your provider with full packageName and ClassName, like the below example
com.example.compiler.MyCompilerProcessorProvider
And create MyCompilerProcessorProvider under kotlin/java directory, this class is the Entrypoint for KSP to recognize your symbols.
import com.google.devtools.ksp.processing.SymbolProcessor
import com.google.devtools.ksp.processing.SymbolProcessorEnvironment
import com.google.devtools.ksp.processing.SymbolProcessorProvider

internal class MyCompilerProcessorProvider : SymbolProcessorProvider {
    override fun create(environment: SymbolProcessorEnvironment): SymbolProcessor {
        return MyCompilerProcessor(environment)
    }
}
After registering the MyCompilerProcessorProvider, it's time to write Processor.
The first step is defining Symbols. Inside the processor, we can identify all the Kotlin code annotated with our symbols and write custom behavior for that. Each symbol can target a specific part of the code; they can be used for classes, functions, fields, and other Kotlin code elements.
@Target(AnnotationTarget.CLASS)
annotation class FeatureSymbol
@Target(AnnotationTarget.FUNCTION)
annotation class FeatureSymbol
@Target(AnnotationTarget.FIELD)
annotation class FeatureSymbol
The next step is writing the processor, for instance we want to extract all functions that annotated with FeatureSymbol.
internal class MyCompilerProcessor(private val environment: SymbolProcessorEnvironment) : SymbolProcessor {

    override fun process(resolver: Resolver): List<KSAnnotated> {
        val symbols = resolver
            .getSymbolsWithAnnotation(annotationName = "com.example.compiler.type.FeatureSymbol")
            .filterIsInstance<KSFunctionDeclaration>()

        if (!symbols.iterator().hasNext()) return emptyList()
        val sources = resolver.getAllFiles().toList().toTypedArray()

        ...

        return symbols.filterNot { it.validate() }.toList()
    }
}
After filtering all symbols to focus only on Kotlin functions and resolving the files, we can generate new code based on that. This allows us to extract function names, parameters, keywords, and other relevant details.
However, KSP has a limitation: it cannot modify the existing file itself but can generate new code based on the annotated file.
internal class MyCompilerProcessor(private val environment: SymbolProcessorEnvironment) : SymbolProcessor {

    override fun process(resolver: Resolver): List<KSAnnotated> {

        ...

        // Only for creating file with KT extension
        val file: OutputStream = environment.codeGenerator.createNewFile(
            dependencies = Dependencies(false, sources = sources),
            packageName = "PackageName",
            fileName = "FileName",
        )
        FeatureVisitor(file, "FileName")
        file.close()

        // Create file for any extension like .swift or .json
        val file = codeGenerator.createNewFileByPath(
            dependencies = Dependencies(false),
            path = "$packageName/$fileName",
            extensionName = "json"
        )
        file += (jsonContent)
        file.close()

        return symbols.filterNot { it.validate() }.toList()
    }
}
First, we need to create a new OutputStream to hold the generated content. Then, we add the file content using a Visitor pattern, and once that's done, we close the stream. After this step, KSP will generate a new file with the requested extension.
KSP is powerful enough to generate any extension we want. For instance, we can take Kotlin code as input and generate Swift code based on it.
compiler translates computer code written in one programming language (the source language) into another language (the target language)
internal class FeatureVisitor(
    private val file: OutputStream,
    private val fileName: String,
): KSVisitorVoid() {

    override fun visitFunctionDeclaration(function: KSFunctionDeclaration, data: Unit) {
        super.visitFunctionDeclaration(function, data)
        function.parameters.forEach {
            val paramName = it.name?.getShortName()
            val paramType = it.type.resolve().declaration.qualifiedName?.asString().orEmpty()
        }
    }
}
Next, create a target module to consume the compiler.
plugins {
    id("com.google.devtools.ksp") version "2.0.0-1.0.23"
}

dependencies {
    implementation(project(":compiler"))
    ksp(project(":compiler"))
}
And add the annotation to functions
@FeatureSymbol
fun sayHello(
    name: String
): String {
    return "Hello $name"
}